
Help and Setup
How to install Spam Shield and what each section of the plugin admin does.
Watch: a quick tour
A short walkthrough of the Spam Shield admin: the Dashboard with its incoming and outgoing protection at a glance, the unified Activity log, and the layered Settings.
Installation and first setup
Spam Shield is delivered as a standard WordPress plugin zip file. You download it from your account on this site after purchasing or during your trial.
Step-by-step installation
-
Download the plugin zip. Log in to your account at your account page, find your license, and click "Download plugin zip" to get
qweb-spamguard-ai-1.12.0.zip. -
Upload and activate in WordPress. Go to Plugins → Add New → Upload Plugin, choose the zip file, click Install Now, then Activate. The plugin admin appears in your WordPress sidebar under Spam Shield AI.
-
Paste your license key. Open Spam Shield AI → Settings and find the License tab (or the license notice at the top of the Dashboard). Paste your license key and click Activate. Your key is in your account page.
-
Enable the integrations you need. Go to Settings → Integrations tab and turn on each form plugin you're using (WooCommerce, CF7, Gravity Forms, WPForms, Fluent Forms, Comments, Registration). You don't have to enable all of them.
-
Done. Submit a test form (it won't flag a normal submission) and check the Dashboard to confirm Spam Shield is receiving form events. AI screening is already working: it is included with your license and runs through the QWeb platform, so there is no API key to create or paste.
Dashboard
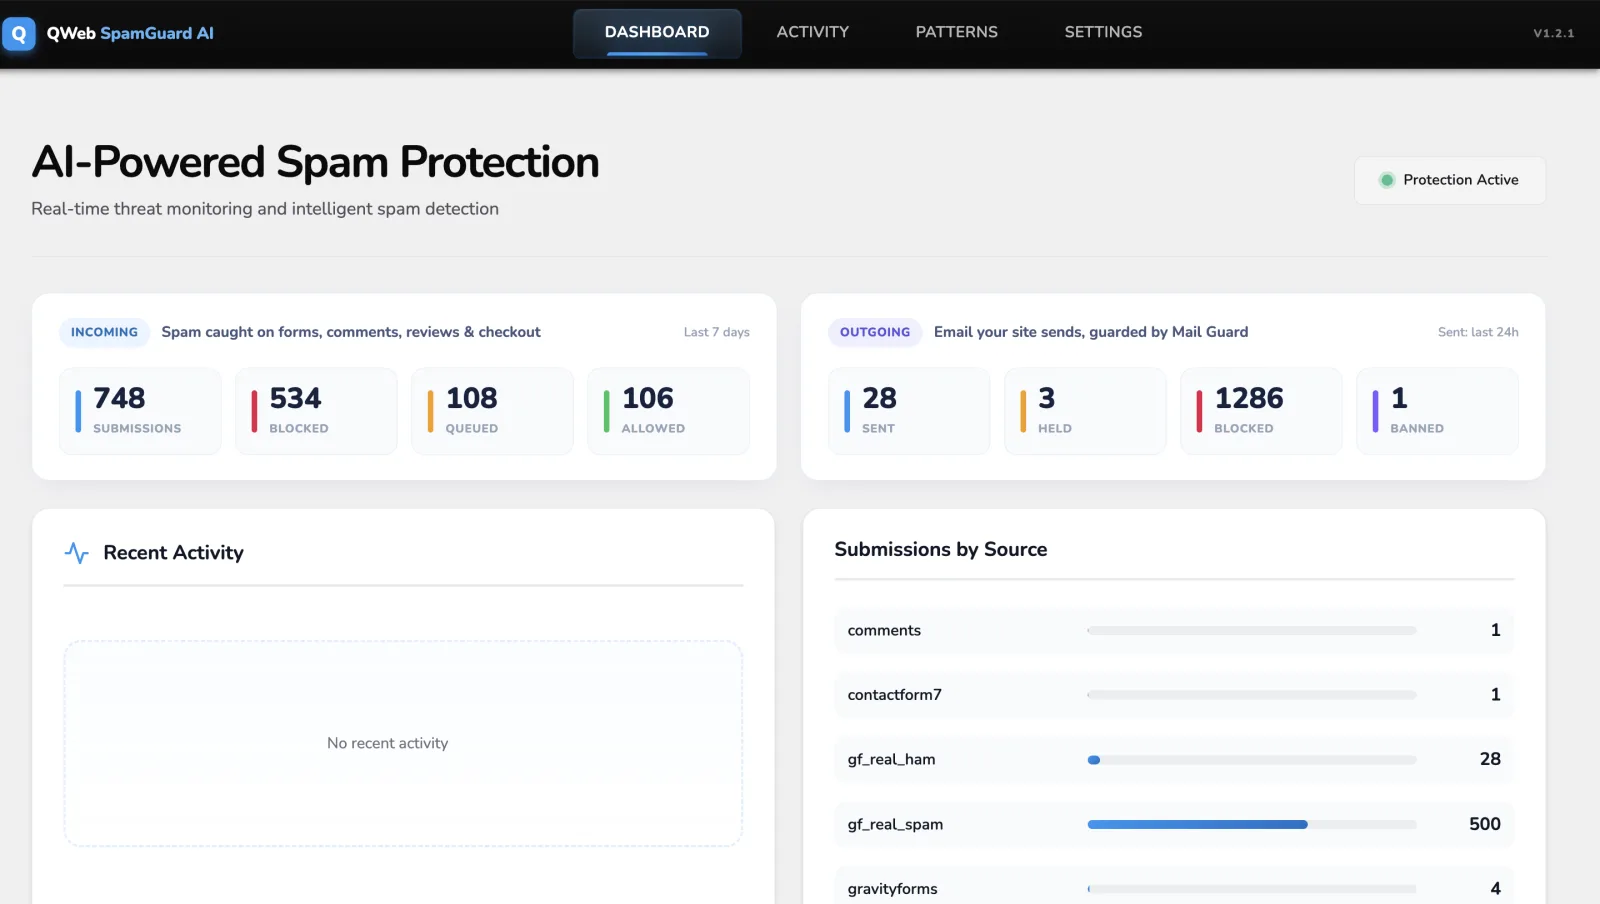
The Dashboard is the first screen you see when you open Spam Shield AI in WordPress. It gives you a quick picture of what Spam Shield has been doing without requiring you to dig into the logs.
What the numbers mean
- Blocked today / this week / this month — the count of form submissions or emails that Spam Shield flagged. This includes items in the review queue (not yet reviewed by you) and items you've already approved to block.
- Detection breakdown — a chart showing which method caught each item: AI analysis, disposable email domain, keyword pattern, or honeypot. If most of your spam is caught by the rule layers, very little of your plan's AI allowance is used.
- Recent flagged items — the last 10 flagged submissions. Each row links to the full queue entry where you can release or delete it.
- 30-day sparkline — a small line chart at the top showing spam volume per day for the last 30 days. Useful for spotting spikes that might indicate a targeted attack.
Settings
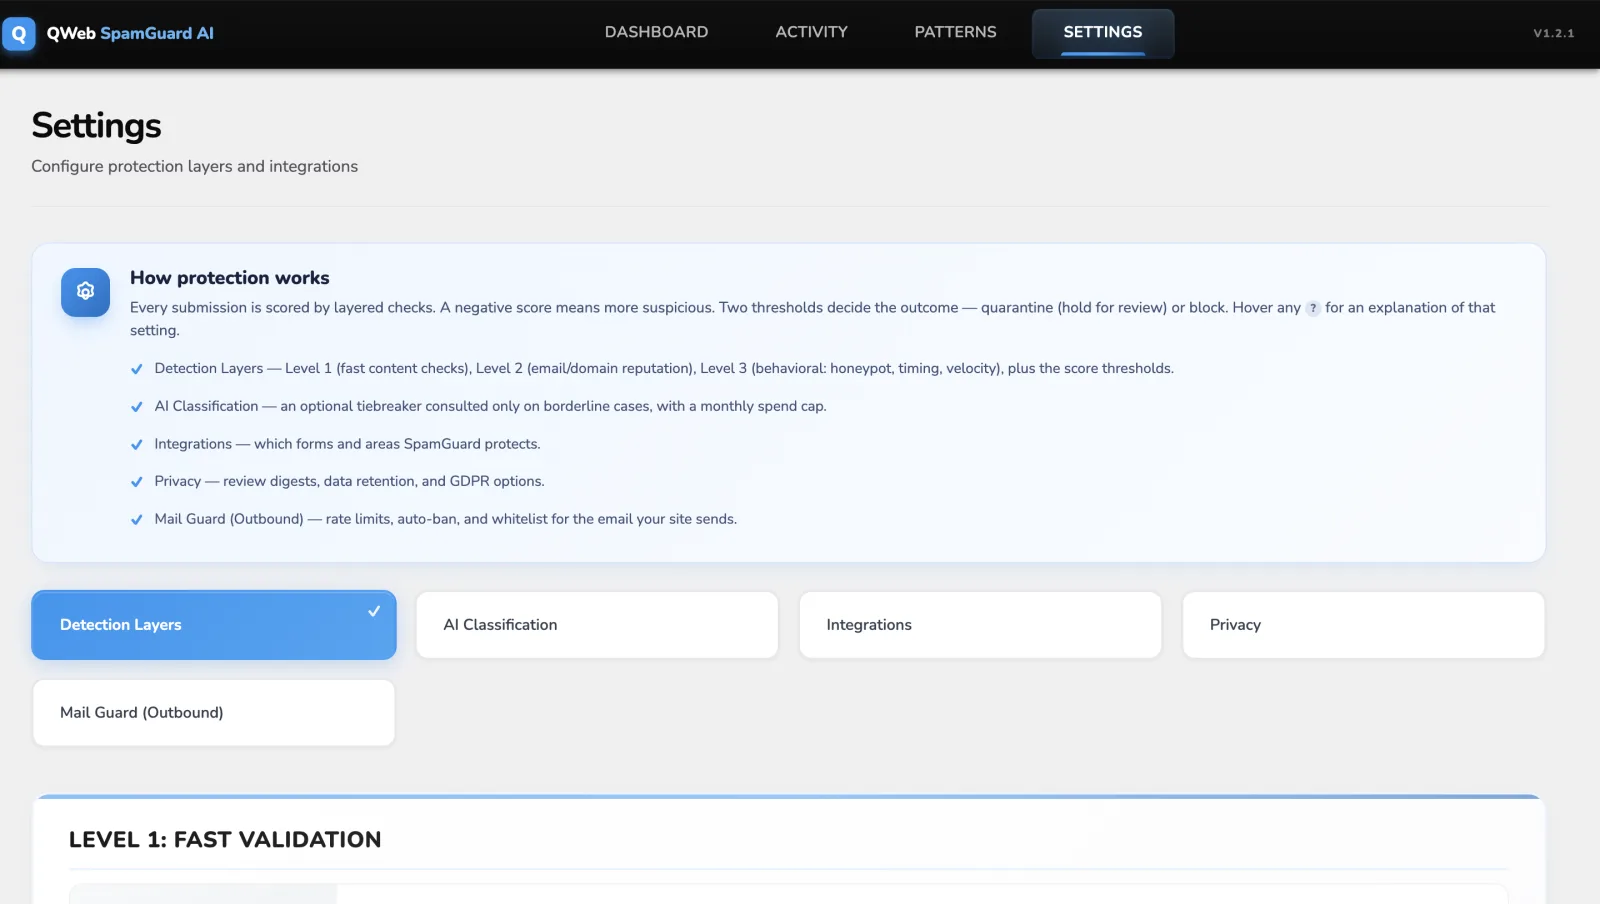
The Settings page has four tabs: Detection, AI, Integrations, and Queue and Privacy.
Detection tab
- Detection sensitivity (1-10) — controls how aggressively Spam Shield flags submissions. At 5, only high-confidence spam is blocked. At 9, borderline submissions are flagged for review rather than passed through. Default is 7. If you're seeing too many false positives, lower this. If obvious spam is getting through, raise it.
- Disposable email blocking — toggle on to check registration and checkout emails against the built-in throwaway domain list. Recommended: on.
- Keyword patterns — a custom list of phrases or regex patterns that always trigger a block (deny list) or always allow through (allow list), regardless of the AI score. Useful for known spammers or trusted addresses.
AI tab
- AI screening — included with your license and routed through the QWeb platform. There is no API key to create or paste; if your license is active, the AI tiebreaker is available. Usage is metered per plan, and the rule layers catch most spam before the AI is ever consulted.
- AI site profile — a one-time profile of your site (what you sell, who writes to you) that the AI uses to judge submissions in your business context. It builds automatically after activation; you can review or rebuild it here.
- Fallback behavior — what happens if the AI service is slow or unreachable. The default is fail-open: the submission is let through or held for review, never hard-blocked on a timeout, so an outage can never cost you a real customer.
Integrations tab
Each WordPress form plugin or feature has its own toggle. Spam Shield only hooks into integrations you turn on, so there's no performance cost for integrations you don't use. If you don't use Gravity Forms, leave that toggle off.
Queue and Privacy tab
- Queue retention — how many days flagged items stay in the queue before being auto-deleted. Default 30 days. Reduce if you want a smaller database footprint.
- Log retention — how many days spam log entries are kept. Default 90 days.
- Store submission content — whether the actual submitted text is stored in the database alongside the log entry. Disable this if you have privacy requirements that prevent storing form data.
Spam Patterns
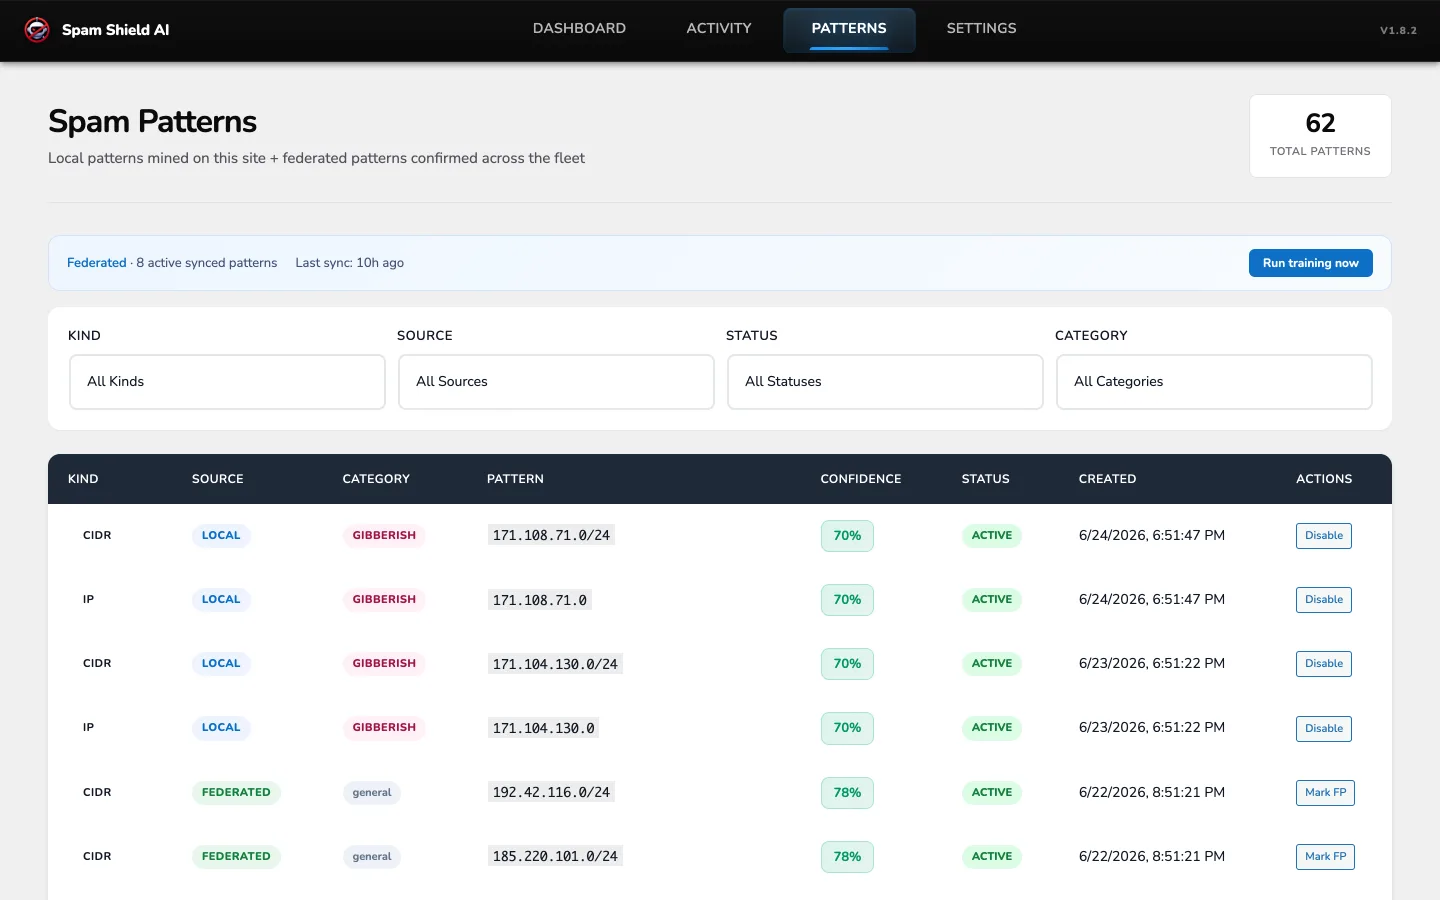
The Patterns tab is where Spam Shield's network defense lives. Every protected site mines its own confirmed spam into reusable fingerprints, and once enough independent sites agree on a pattern it is shared, fully redacted, so every other licensed site is protected too. A brand-new install starts catching pattern-based spam from day one.
What you see here
- Local patterns — fingerprints mined from your own blocked and held submissions, grouped by category (pharma, casino, crypto, phishing, gibberish, and more).
- Network patterns — confirmed patterns pulled from the shared federation, with the contributing-site count and category for each. Only redacted patterns are ever exchanged: never your form content, email addresses, or IPs.
- Category opt-outs — switch off any category that overlaps your legitimate traffic, and it is neither applied to your site nor contributed from it.
Mail Guard
Mail Guard protects your domain's email reputation by intercepting outbound
messages from wp_mail() before they're sent.
When an email looks like spam (typically because a bot submitted a contact form
and the plugin is about to relay that content to you), Mail Guard holds it in
a separate queue.
This is separate from inbound spam detection. You can use one without the other.
Enabling Mail Guard
Go to Mail Guard in the sidebar and click the enable toggle at the top. Mail Guard starts intercepting immediately. All outbound emails still go through; only those the AI flags as suspicious are held.
Mail Guard settings
- Whitelist — email addresses or domains that are always sent without inspection. Add your own email, your transactional service's from address, or any address that should never be filtered.
- Ban list — addresses or domains that are always blocked, regardless of content. Useful if you know a specific spammer keeps submitting from the same address.
- Auto-release threshold — if the AI assigns a low enough spam probability, you can set Mail Guard to release the email automatically rather than queue it.
Reviewing held mail
The Mail Guard page shows the outbound queue. Each row shows the recipient email, the subject line, the AI's reason for holding it, and the date. You can release (send now) or delete each item. Bulk actions are available.
Queue
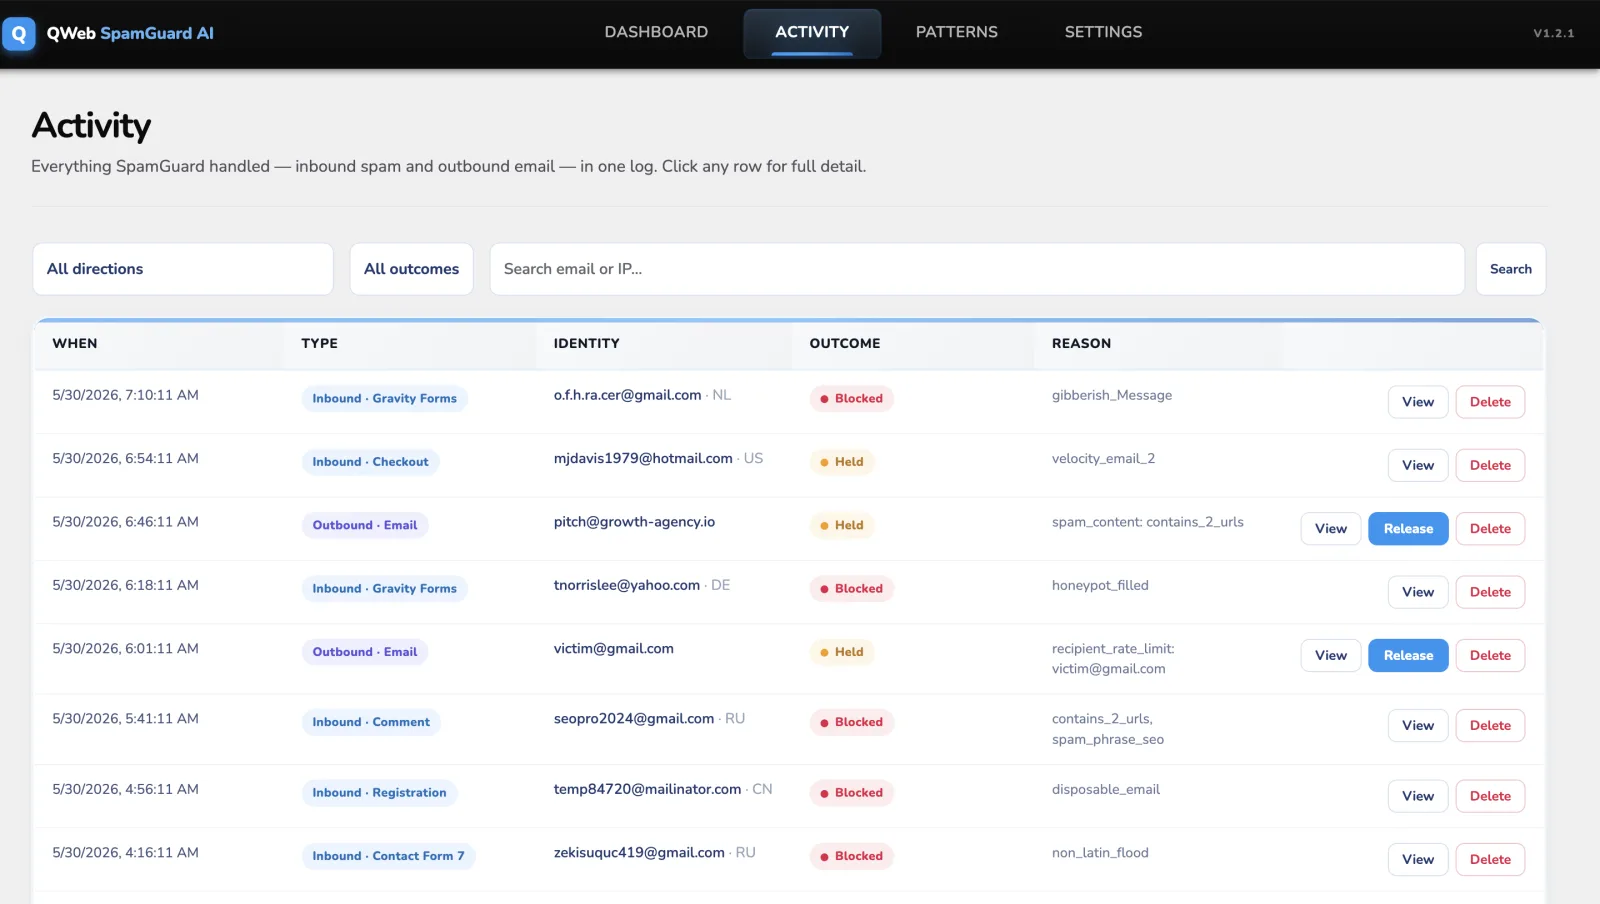
The Queue page has two tabs:
- Inbound spam — form submissions Spam Shield flagged before they were processed. These are submissions that didn't go through as comments, orders, registrations, or form notifications.
- Outbound held — emails intercepted by Mail Guard before delivery. This is the same queue shown on the Mail Guard page.
Queue actions
- Release — marks the item as a false positive and lets it through. For inbound items, the form submission is processed normally (the comment is published, the order goes through, etc.). For outbound, the email is sent.
- Delete — removes the item from the queue permanently. The submission or email is discarded.
- View details — shows the full submission content, the IP address, the country, the detection method, the AI confidence score, and the AI's plain-language reason for flagging it.
Bulk select is available on both tabs. If you're doing a review session after a spam spike, you can select all and delete in one click.
Logs
The Logs page is a searchable, filterable history of all spam detection events. Unlike the queue (which only shows items waiting for your review), the log records everything: blocked items, released false positives, and auto-passed submissions that scored below your threshold.
Reading a log entry
- Type — the kind of submission: WooCommerce order, CF7 form, comment, registration, outbound email, etc.
- IP address — the submitter's IP. Click to search the log for other submissions from the same IP.
- Country — the submitter's country from the GeoIP database, shown as a flag and ISO code. The GeoIP database is downloaded automatically from MaxMind GeoLite2 on first use and updated monthly.
- Detection method — what caught it: AI analysis, disposable email, keyword pattern, or honeypot.
- AI score — a 0-100 confidence score from the AI screening. A score above your sensitivity threshold triggers a flag.
- Action taken — blocked (submission rejected), queued (held for review), or released (false positive, let through).
Filtering logs
Use the filter bar at the top of the Logs page to narrow by date range, submission type, detection method, country, or IP address. Filters combine (AND logic), so you can quickly find "all WooCommerce orders from country X in the last 7 days."
Ready to install?
Start a 7-day free trial and have Spam Shield running on your site in 10 minutes.